
Enter Orders by Item
Overview:
The Order By Item feature provides the option to enter and edit orders by Inventory Item (as an option to enter orders by Vendor).
If your normal order decision process is to determine the items you want to order first and then determine the vendor, then Order by Item will facilitate this process.
There is an option to create Order by Item templates. Like the Order by Vendor Template, there is an option to suggest order quantities using Par Levels and/or Usage Projections.
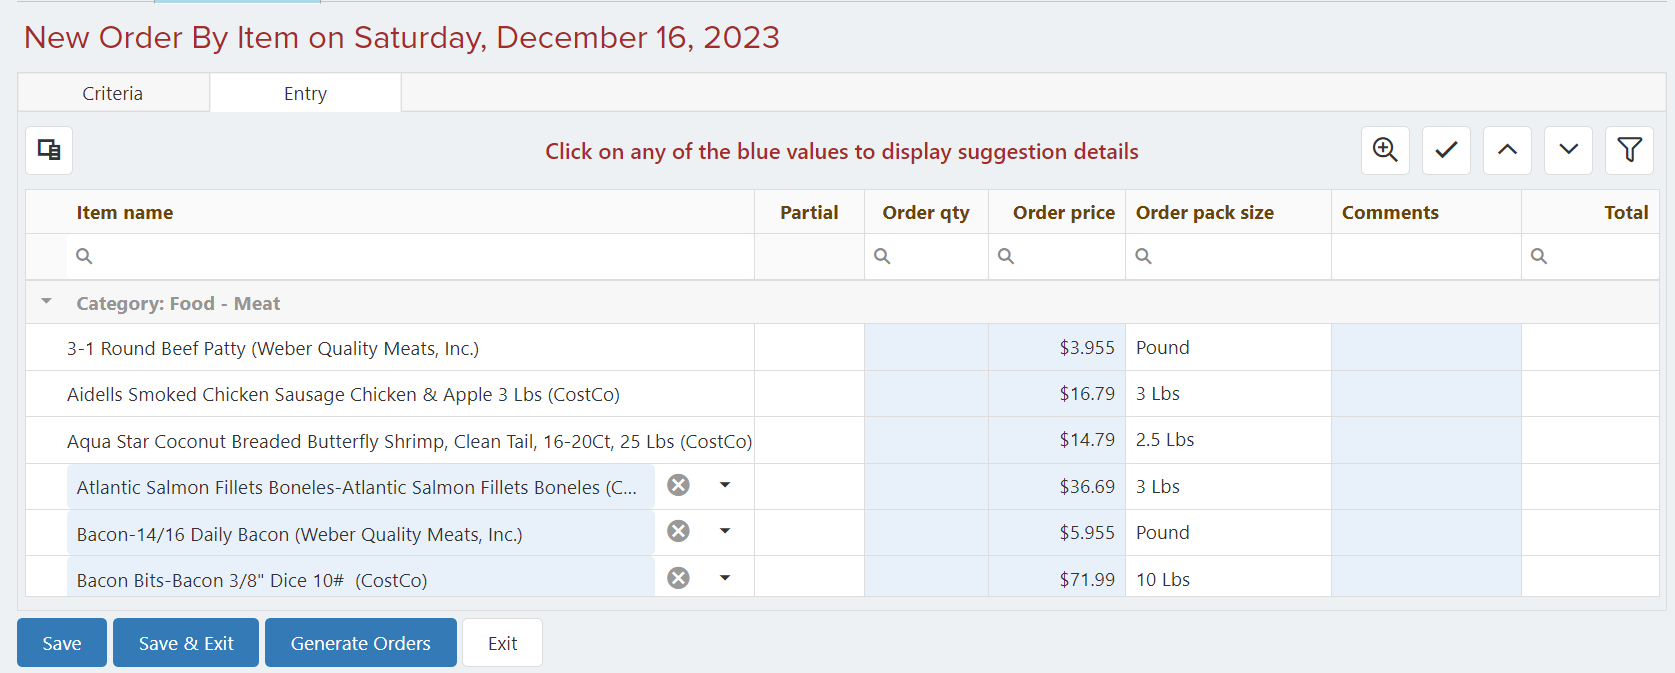
Order by Item can also help you select which vendor to order an item from in situations where you get the same item from more than one vendor. An example of the entry display is shown below:
Things to know!
- For a discussion about the options for implementing ordering, you can click this link to Ordering - FAQs.
- The ordering features and reports will only be available if Ordering is enabled in your Company Settings.
- Orders can optionally first be recorded on an "Order by Item Worksheet". After they are recorded on the worksheet, they can be entered via this Order by Item feature.
- Inventory orders can be entered via a Desktop Computer or using a mobile Tablet.
- Order by Item has features to assist with selecting the vendor to order an item from. The use of these features is optional and the features are reviewed later in this article.
- Orders can be emailed to Vendors (requires email options to be set up in the Vendor Setup feature).
- Some vendors such as Sysco and US Foods can accept electronic orders from COGS-Well. Please ask support@cogs-well.com for more information if you are interested.
- There is an option to configure Users who can and Users who cannot send orders to vendors. Please click this link for more information on "Send Order to Vendor Requests".
- Orders can be reported in detail or summarized via Inventory>Reports>Order Report. Please see this link for more info on the Ordering Report: Order Report.
Special Order by Item Options:
- Order by Item Templates can be set up to facilitate ordering for specific vendors. Please see this link for more info: Order by ItemTemplates.
- COGS-Well can suggest order quantities using Par Levels, Usage Projections, or a combination of both. Suggested Quantity Types (SQTs) must be set up to perform suggested quantity calculations.
This article is for entering orders by item without using suggested quantities. This link has more information on Using Suggested Quantities for Order by Item Entry.
Enter Orders by Item:
To add, review, edit, or delete Orders by Item, use the Sidebar to navigate to the Ordering menu option and then select the Order by Item feature from the submenu. Upon selection, a Find Grid similar to the one below will display a listing of all of your historical orders that have been entered and saved:

Find Grid Definitions:
+ Add, Export, and Search Options:

- The blue "+ Add" button is used to add a new transaction.
- The "XLSX" button will export the information on the grid to a spreadsheet.
- The search option can be used to find any part of a word or date on the grid. Type in your search criteria to initiate the search.
Edit/Delete: Click the button to the right of the row that you wish to edit or delete.
# of Transactions that Display: If you are using the "Close Inventory" feature, and you select via your Company Settings not to hide Order transactions after an Inventory Count is Closed, then you will see and can view Order transactions before a Closed Count, but you cannot edit them.
Order Date Column: This is the date the transfer occurred.
Delivery Date Column: This is the Anticipated Delivery Date when the order was placed or last modified.
Orders Created: An order that is entered by item can be converted to a purchase order for each vendor. This column will have a check mark if a purchase order was created.
Last Updated and Updated By Columns: These columns display when the count was last updated and saved and the User it was Updated By. These columns can be filtered to find specific information.
Special Column Tools:
- Magnifying Glass Icon: The magnifying glass at the top of each column in the above grid has a search function that enables you to search within that field. If you hover your mouse over the magnifying class you will see options to use to refine your search.
- Magnifying Glass and Calendar Icon: If a column has a magnifying glass and a calendar at the top of the column, the calendar can be used to select a date, and if you hover over the magnifying glass after you select a date, you will have options to refine the filter (such as equal to or greater than the selected date).
- All Incon: Columns that display "All" have a drop-down arrow on the right that can be used to select and filter for a specific status.
The Find Grid includes more tools to help you find, filter, or sort the information on the grid according to your requirements. Some of these tools are intuitive, but other helpful tools can easily be overlooked. Please click this link for more information on Find Grid Tools - FAQs.
Add Orders By Item - Criteria Tab:
To add a new order by item, click the blue "Add" button on the Transaction Grid and a Criteria Tab like the one below will display:

Site: If your company has multiple sites, and if you are logged into your company, then you will be asked to select a Site. You can use the drop-down to select a Site. If you are logged into a Site, you will not see this prompt as it will default to the Site you are logged into.
Order Date: Enter or Edit the date (use calendar search) that the Order is being made.
Delivery Date: Enter or Edit the date (use calendar search) that the Order is expected to be delivered.
Order By Item Template: If you have created Order By Item Templates, then you can use the drop-down to select one.
Inventory Department: Use the drop-down to select a specific Inventory Department. Blank will include all Departments.
Inventory Category: Use the drop-down to select a specific Inventory Category. Blank will include all Departments.
Inventory Item Group: If you want to order a certain group of items, and you do not have an order template set up for those items, an example might be a group called "Meats" or a group called "Daily Order Items", then you can use the drop-down to select the group here. Blank defaults to all Groups. In the above example, we selected meat.
Vendor Selection - Optional:
Order by Item can also be used to assist in Vendor selection for items that are purchased from more than one vendor. If you wish to use this feature you will need to have a Combined Item setup for each of these inventory items.
If you are using COGS-Well for Vendor selection based on pricing, there is a setting on the Ordering Tab in Company Settings, for the number of pricing activity history days. This represents how many days back in history COGS-Well will go to evaluate vendor prices.
First and Second Combined Item Selection Method: If you have set up Combined Items for Inventory Items that you buy from multiple vendors, an example being that you buy bacon from Costco and Weber Meats, then COGS-Well can, optionally, help you select which vendor to buy from.
Vendor Selection: COGS-Well can select the vendor using three possible criteria options: 1) Preferred vendor, 2) Lowest price vendor, and 3) Most recent price vendor. Use the drop-downs to select your first and second priorities for selecting the vendor (the priorities will default to what is set up on the Ordering Tab on your Company Settings).
Selection Method Definitions: Vendors can be flagged to be Preferred in the Vendor Setup feature. Once flagged as preferred, they will be preferred for all of the Inventory Items that you purchase from them. The lowest price vendor option looks back at the number of days you configured on the Ordering Tab in Company Settings and selects the vendor with the lowest price.
The prices could be from receiving records or the vendor Prices feature in Inventory Setup. The most recent price will select the vendor with the most recent receiving or price update record. Please know that if COGS-Well selects a vendor, you will still have the option to change the vendor as described below.
Add Orders By Item - Entry Tab:
The blue next button on the bottom left of the Criteria Tab (shown above) will advance you to the Entry tab. You can also click on the Entry tab. Below is an example of the Items Entry Grid on the Entry Tab:
All Items meeting the Criteria Tab selections will be displayed in the items entry grid. If you are adding a new Order, the Pack Quantities will be empty.
Item Name: When an item name is displayed with the vendor's name in parenthesis after it, the item is an Inventory Item that can be ordered from the vendor in parenthesis at the end of the item name.
Highlighted Item Name: When an Item's Name is highlighted, this means that it is assigned to a Combined Item. In the example above, Atlantic Salmon Filets, Bacon - 14/16, and Bacon Bits are assigned to a combined item.
For a highlighted combined item, the drop-down to the right of the item name and vendor can be used to select a different item that is assigned to the same combined item.
Below we have clicked the vendor drop-down for the Bacon Bits and see the other inventory items assigned to the same combined item. To change to a different inventory item, highlight the other item and then click on it:

Partial Pack Quantity: Partial Packs can only be ordered if Partial Packs are enabled for that Item in the Inventory Item Setup function. Please take a look at the Ordering Tab explanation in Inventory Item Setup for more information. We have redisplayed the Item Entry Grid below:
If any items are enabled for partial pack ordering, the column will be highlighted in light blue with a box (see the example below). If you click on the box in the partial column, the Pack Size will change to Partial Packs and you can enter the Quantity for the Partial Pack. In the example below, the Philly Steak can also be ordered in pounds as well as the 10 Lbs full Pack Size.


Order Quantity: Enter the order quantity (based on the Pack Size) that you wish to order for the Item in the row.
Price: The price will default to the last received price unless "Ignore Receipt Prices" was flagged for this Vendor in the Vendor Setup feature. Prices can be edited if "Allow Price Changes When Ordering" is enabled in the setup for the vendor.
Pack Size: This is how the vendor packages and prices the Item. The Order Quantity that you enter for an order should reflect the Pack Size. The Pack Size cannot be edited.
Comments: You can comment on the Item you are ordering such as, "Fill only if fresh".
Total: This is the total cost for each item, based on the Quantity and Price.
Special Buttons: The buttons at the top of the display provide additional features as described below:
 Collapse all the Categories to navigate to a specific category or location.
 Reverses the above Collapse feature.


 This button on the top left of the item entry grid is called a column chooser. The column chooser lets you select which columns to display (or not) on the entry grid. Detail on using the column chooser are provided at the end of this article.
Comment on Order by Item and Storage Locations:
It may save time when using an Order By Item Worksheet or entering orders on a tablet, to set up an Order By Item Template with the Items in storage location sequence
Save, Save & Exit, Send to Vendor, and Exit
At the bottom of the screen are the Save, Save & Exit, Generate Orders, and Exit buttons.

Save - Saves the count without exiting.
Save & Exit - Saves and exits the count.
Generate Orders: Because there is the potential for items to be ordered from multiple vendors, the Generate Order button will create a unique purchase order for each selected vendor. After you select this button, the new orders will show on the display when you first select the Orders or Order by Item entry features. To send an order you will need to select to edit the new order.
Exit - Exit without saving.